
Now that Windows 10 has been out for a while, many users are reporting issues about slowdowns with their internet. If you have Windows 10 slow internet speed, some of these might help get you back to what you’re used to. If your Windows 10 is running slow in general (apps, etc), try these tips!
Disable Update Sharing
Windows 10 includes a new peer-to-peer download feature for updates and Windows Store apps. By default, Windows will automatically use your PC’s Internet connection to upload updates so other users can download them using your internet connection.
ALSO READ: TECKLYFE – FIX WINDOWS 10 SLOW PERFORMANCE
- Open it by clicking the Start button and selecting “Settings” at the bottom-left corner of the Start menu.
- In the Settings window that appears, click (or tap) the “Update & security” icon.
- Click the “Advanced options” option at the bottom of the Windows Update pane.
- Scroll down to the bottom of this pane again and select “Choose how updates are delivered.”
- Select the option you prefer under “Updates from more than one place.” We recommend just selecting “PCs on my local network” here.
– Off: This disables the peer-to-peer update feature entirely. Updates will only be downloaded from Microsoft’s servers, and won’t be uploaded to anywhere.
– PCs on my local network: This is the best option. With this enabled, you’ll benefit from peer-to-peer updates on your home or work network. This means faster downloads and less download bandwidth used. You’ll only have to download the updates once and they’ll be shared amongst all your PCs. Your PC will never upload updates over the Internet.
– PCs on my local network, and PCs on the Internet: This option is the default, although it probably shouldn’t be. With this enabled, Windows 10 will upload updates from your PC to other computers over the Internet. These computers would normally just download updates from Microsoft, but Microsoft will save on bandwidth because they’re getting some updates from your Internet connection.
Update Your Drivers
- Press Windows key + X and type M to open Device Manager.
- Right Click on the WIFI device (or network adapter) & Select Update Driver Software.
Uninstall OneNote
- Right click on the task bar and select Task Manager. Then select More Details. In the File Menu, select Run New Task and type Powershell. Be sure to check the box to run it with administrative privileges. When Powershell opens, run this command:
Remove-AppxPackage Microsoft.Office.OneNote_17.4027.10061.0_x64__8wekyb3d8bbwe - Or if you are using a different architecture, run Get-AppxPackage, scroll up the window to find Microsoft.Office.OneNote. Replace the line above after Remove-AppxPackage with the PackageFullName string after : shown in your results. I’m running x64. The x86 version may look different.
Adjust Internet Bandwidth Settings
By default, Windows 10 reserves about 20% of your system bandwidth for operating system tasks. You can re-gain this 20% by making the changes below.
Press Windows shortcut keys Win + R to open Run dialog box.
- Type gpedit.msc and then hit OK.
- Click on Computer Configuration on the right side of the window.
- Navigate to: Administrative Templates > Network > Qos Packet Scheduler > Limit reservable bandwidth.
- Click on Enable.
- Change the Value to 0.
- Apply and then click OK.
- Reboot.
Disable Window Auto-Tuning
- Press Win + X and then select Command Prompt (Admin).
- Type the command
netsh interface tcp show globalin the window and press enter.
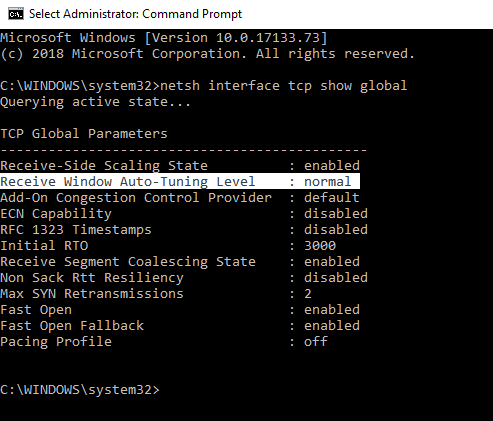
- Check for Receive Window Auto-Tuning Level and if it is normal as seen above, you will need to disable it.
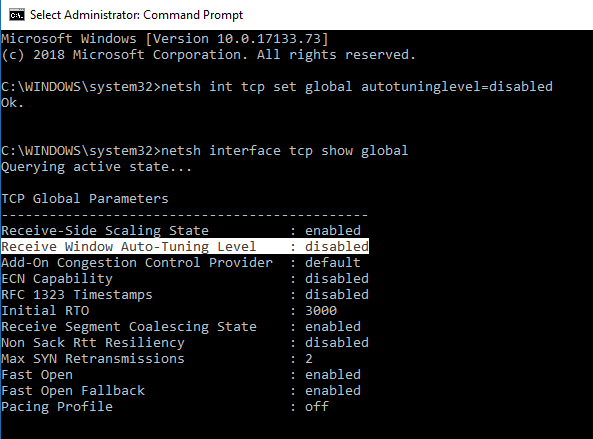
- Type the command
netsh int tcp set global autotuninglevel=disabledto disable it and press enter and you should receive an OK message as seen below.
- You can always change the setting back to normal by running
netsh int tcp set global autotuninglevel=normal
Disable Large Send Offload (LSO)
- Right click on the Start menu and select Device Manager.
- Expand Network Adapters.
- Double-click your network Card > select the Advanced > Large Send Offload V2 (IPv4) and change it to Disable then click OK.
Check For Misc Things
- Right click on the taskbar and select Task Manager
- Click on the Performance tab
- Click on Open Resource Monitor at the bottom
- Click on the Network tab
- Check for apps or services that have high numbers for send and/or receive. These are the apps/services that are using the majority of your bandwidth.
Comments
If you’ve been experiencing this problem, let me know if one of these solutions helped you, or if you’ve come across something else that has helped you and I’ll add it into the article.