You’ve probably seen photos around the internet where the majority of the picture is black and white and there are specific parts of the image that are left in color. If you’re wondering how to do this, you can actually use Photoshop. Depending on the image, it can be a little tidious to do, but the results will be worth it.
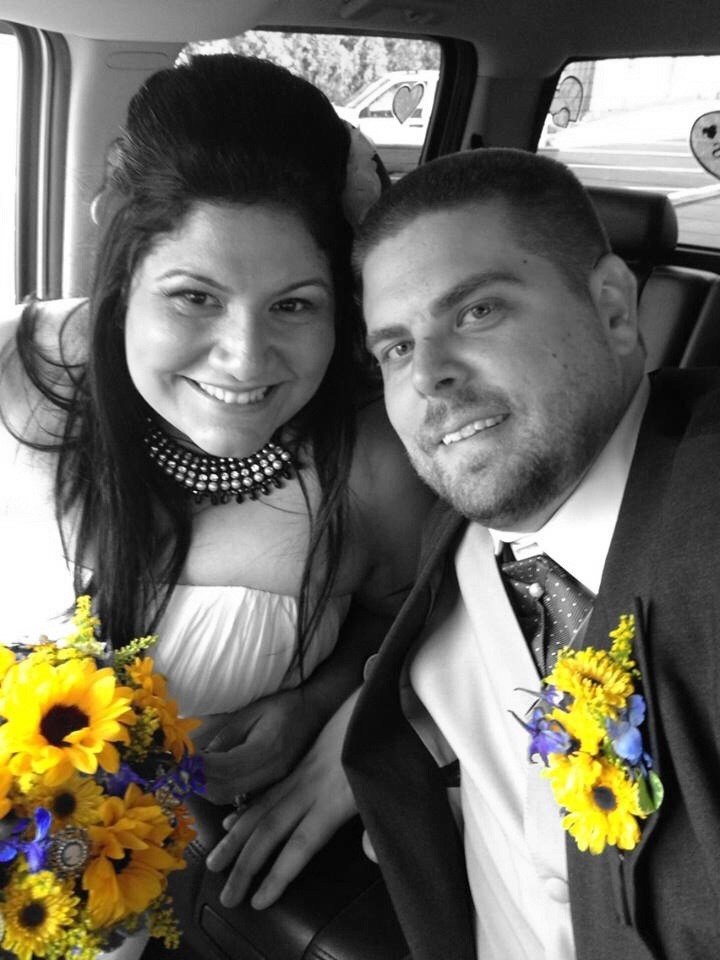 Here’s a selfie image I did of the wife and I after our wedding. The picture was taken in color and I edited it to turn it black and white except for the flowers.
The first thing we need to do is make a selection around the sections you want in color. When making a selection around a complex object, I would try the Quick Selection tool first. The Quick Selection tool is easy and fast and if it doesn’t work it only takes a second to try but when it does work it saves you lots of time.
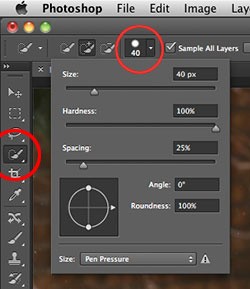 To use the Quick Selection tool, think of it as a paint brush where you paint over the areas you want selected. Photoshop will analyze the area you paint over and expand the selection where it thinks you want it to. To make sure you don’t paint over areas you do not want selected you might need to adjust the size of the Quick Selection brush in the Tool Options at the top. You don’t want to make it too small because it will take longer to cover the area so make it just small enough to get between the small areas.
The Quick Selection tool will sometimes grab areas you don’t want selected. If you need to adjust the selection, hold the Alt key while painting and the Quick Selection tool will subtract the selected areas.
Now that we have the sections selected, we need to Inverse the selection to get the background selected. To do this, go to the menu Select>Inverse.
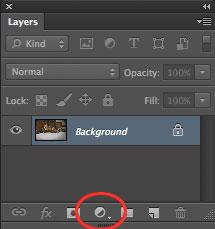 With the background now selected, go to the Adjustment Layer menu and choose a new Black and White adjustment layer. With this adjustment you can adjust the color sliders to get the desired look you want out of the black and white area. If you’re using Photoshop Elements or an earlier version of Photoshop you can use the Hue/Saturation adjustment layer instead.
Be sure to view your image at 100% to make sure the mask edge looks good. If the edge is too sharp you can try feathering the edge first to see if it fixes it. Be sure to select the mask icon in the Layers panel and in Photoshop CS6 you will go to the Properties panel and adjust the Feather slider. If you’re in CS5 or CS4 you will use the Mask panel to adjust the Feather slider. And, if you’re in an earlier version of Photoshop or Elements you will need to select the Mask icon and apply a Gaussian Blur filter to the mask in the menu Filter>Blur>Gaussian Blur.
If you’re not happy with the Feather results you can try a different technique. You can use the Edge Detection feature introduced in CS5. With the mask icon selected in the Layers panel, go to the Properties panel in CS6 or the Mask panel in CS5 and click on the Mask Edge button. The Refine Mask dialog box will open and we will have many options to adjust the mask.
The first thing you want to do is adjust the View Mode at the top of the dialog box so you can see how the adjustments affect the mask. Click on the View button and choose On Layers option. This will let us see the effects on the image in real time. Now select the Smart Radius in the Edge Detection section to see if this automatically fixes the mask around the edge. The Smart Radius will try to figure out what should and should not be masked. Adjust the Radius amount to expand the Radius and encompass the edge if needed. Sometimes this works great on its own but other times it will not figure it out the edge on its own and you can try using the Refine Radius brush tool to adjust areas around the edge.
Select the Refine Radius brush tool to the left of the Edge Detection section and paint over the areas where the mask does not look good over the edge. If you go too far outside the edge the Erase Refinements Tool in the same place as the Refine Radius brush tool by clicking and holding on the icon. If you need to move around the photo and paint over areas not visible in the window hold the Space Bar on your keyboard which will temporarily turn on your Hand tool and move the picture to where you ned to. Once you’re happy with the mask edge, hit the OK button. We should now have a really good mask around the object.
To add some contrast to the selection you can use the same mask, Command-click on the mask icon in the Layers panel (PC users: Control-click). This loads the mask as a new selection but right now the background is selected. Now were going to Inverse the selection again in the menu Select>Inverse. With the subject now selected, choose a Levels adjustment from the Adjustment Layer menu and you can adjust the Black and White triangles to create contrast or adjust the middle Gray triangle to adjust brightness. The same process could be used to add any adjustment layer you want to the subject.