
As a Windows 10 user, there have been many frustrations over the years such as Windows 10 Running Slow, having Slow Internet in Windows 10, etc. In this article, we’ll discuss another cause for Windows 10 slowdowns and how to fix 100% disk usage in Windows 10. Unfortunately there can be a number of reasons that cause your disk usage to reach 100%, so we’ll cover some of the more common issues and fixes here. As always, if none of the options below resolve your problem, please leave a comment below and we can try to help you troubleshoot your issues.
Related Article: How to Fix Windows 10 Slow Performance
Determine if You Have 100% Disk Usage
The first step to troubleshooting your Windows 10 slow performance issues is if to check if you’re actually suffering from the 100% disk usage problem. If you right-click on your taskbar, select Task Manager from the menu. On the Processes tab you should see a column for Disk and it might look like the image below.
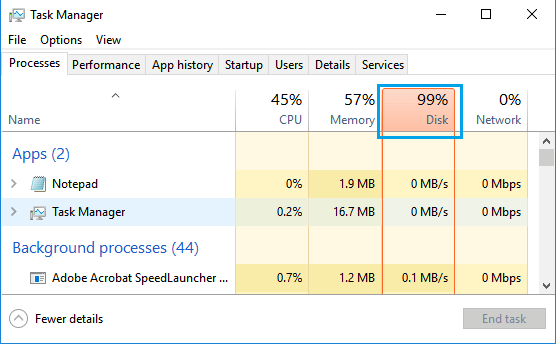
You’ll see the disk column highlighted in a red color, indicating that it is higher than normal. You can click on the column header once and it’ll sort the processes by disk usage. If you can spot one at the top of the list, that’ll be the first one you want to tackle because it is probably your main cause.
100% Disk Usage Because of Skype
If you’re a Skype user, there are a couple of ways you can try to resolve Skype from using 100% of your disk usage, and each will vary depending on the version of Skype you’re using.
Disable Skype From Starting At Logon
This setting will be in different locations depending on if you’re using the Skype Windows Store app, Skype desktop app, or Skype for Business. Go into your Skype settings and look for something like “Automatically start the app when I log on to Windows” and turn it off. Obviously if you use Skype, then this won’t fix your issue in the end, it’ll just prevent Skype from opening when you logon.
Fix ALL APPLICATION PACKAGE Permissions in Skype Desktop
If you’re using the Skype Desktop version, you may been to give ALL APPLICATION PACKAGE write permissions on the Skype.exe file. Some users have reported success in fixing 100% disk usage in Windows 10 with this.
- Quit Skype Desktop
- Browse to C:\Program Files (x86)\Skype\Phone\
- Right-Click on Skype.exe and go to Properties
- Go to the Security tab, click on ALL APPLICATION PACKAGES and click Edit
- Click on ALL APPLICATION PACKAGES again and check Allow for the write permissions
- Click on OK and OK again to save the changes
100% Disk Usage Because of Chrome
Some users have had issues with Google Chrome causing 100% disk usage in Windows 10. This is usually caused by Chrome’s Prediction Service, which causes Chrome to preload pages it thinks you’re going to visit in the background.
To Disable Google Chrome’s Prediction Service:
- Open Chrome, click on the 3-dot menu, go to Settings
- Go to the bottom of the screen and click on Advanced
- Under Privacy and Security, find Use Prediction service to load pages more quickly and turn it off
Turn Off Google Chrome Background Apps
Another thing in Chrome that could be causing high disk usage is if you have Chrome apps that run in the background even after Chrome is closed.
- Open Chrome, click on the 3-dot menu, go to Settings
- Go to the bottom of the screen and click on Advanced
- Under System, find Continue running background apps when Google Chrome is closed and turn it off
Windows Search Causing 100% Disk Usage in Windows 10
Windows Search is a feature that lets you search for various things on your computer by keeping an index of files and folders. You can see what Windows Search keeps in index by click on Start and type Indexing Options and selecting the Control Panel option that appears.
To test if Windows Search is causing 100% disk usage in Windows 10, open a Command Prompt as Administrator, and run net.exe stop "Windows Search". In Task Manager, see if your disk usage returns to normal. If it does, then you can try to disable the Windows Search service. Keep in mind that this will cause searching to be slower if you’re trying to find files or folders. If it doesn’t, then run net.exe start "Windows Search" in the command prompt window to turn the service back on.
To Permanently Stop Windows Search Service:
- Click on Start and type Services and click on the Services Desktop App that shows up
- Scroll down and double-click on Windows Search
- On the General Tab, change the Startup Type to Disabled
- If the service is running, click the Stop button
- Click on OK
Windows SuperFetch Causing 100% Disk Usage in Windows 10
SuperFetch is usually a good feature to have on and keep enabled because it can help improve your computer’s performance over time. If it is the cause of your high disk usage though, it might be doing more harm than good, so you can try to turn the service off to reduce your disk usage. Just as we did with the Windows Search service, you can run net.exe stop superfetch from an administrator command prompt to see if your disk usage returns to normal with the service stopped. To start the service again, run net.exe start superfetch from the administrator command prompt.
To Permanently Stop SuperFetch Service:
- Click on Start and type Services and click on the Services Desktop App that shows up
- Scroll down and double-click on Superfetch
- On the General Tab, change the Startup Type to Disabled
- If the service is running, click the Stop button
- Click on OK
Disable Windows Tips, Tricks, and Suggestions
Some people have reported that the Windows Tips feature has caused slowdowns in Windows 10, including 100% disk usage. You can disable this feature by going to Settings > System > Notifications & Actions > Get tips, tricks, and suggestions as you use Windows and turn it off.
Run ChkDsk Command
The Windows ChkDsk command can search for hard drive for issues, including bad sectors. Depending on the size and speed of your hard drive, this could take a while and you might be forced to reboot your computer in order to run it.
- Right-click on the Start button and click on Windows PowerShell Admin or (Command Prompt Admin) option.
- Type
chkdsk.exe /f /rand hit the enter key on the keyboard of your computer. If you are prompted to schedule volume to be checked on next restart, type Y and reboot. - The /f in above command fixes errors as detected, while /r identifies bad sectors and tries to recover information from them.
Resolve A StorAHCI.sys Driver Bug
StorAHCI.sys intended for storage devices connected to the PC or laptop motherboard via Advanced Host Controller Interface PCI-Express, but some users have experienced high disk usage because of this firmware driver.
- Open the Device Manager (type it in after clicking Start)
- Expand IDE ATA/ATAPI Controllers
- If an AHCI Controller entry is listed, double-click, then open the Driver tab and select Driver Details. If the driver is C:\Windows\system32\DRIVERS\storahci.sys then you could be affected by this bug.
- Close the driver details box and switch to the Details tab, selecting Device instance path from the drop-down menu. Where the Value is listed, right-click, and select Copy. Launch your text editor and paste the value for later.
- Next, press Windows key + R and type regedit, followed by the OK button.
- Navigate to this address: HKEY_LOCAL_MACHINE\System\CurrentControlSet\Enum\PCI\ and use the pasted string above to open the correct AHCI Controller, followed by the random number.
- Expand Device Parameters\Interrupt Management\MessageSignaledInterruptProperties and you should see MSISupported listed in the right-hand pane.
- Double-click MSISupported and change the Value data to 0.
- Click OK to confirm, and follow the instructions to restart Windows.
Disable Diagnostic Tracking in Windows 10
Right-click Start and select Command Prompt Admin (Or PowerShell Admin), then input these commands to disable and stop DiagTrack:
sc config "DiagTrack" start= disabled

sc stop "DiagTrack"
Search for Malware and Viruses
Finally, if none of the above work, remember to routinely scan your computer for viruses and malware. There are a number of tools you can use for this, including the built-in Windows Defender.
Final Thoughts
If you still can’t resolve your 100% disk usage in Windows 10, you can also seek professional consulting help. You can also leave a comment below with your findings from Task Manager and we can try to assist you with finding the cause. You can also make use of our discussion forums.