The next segment in our InfoSec System Hardening series is how to harden an NGINX Web Server. NGINX is an alternative to the popular Apache Web Server on Linux. In this article, we’ll show you some of the basics you’ll want to take to secure your NGINX Web Server. To get started, you can follow our guide to Installing NGINX in Ubuntu or Installing NGINX in CentOS/RHEL/Fedora. If you’re wanting to install WordPress, we also have a guide for Hardening WordPress and using HTTPS with Let’s Encrypt on NGINX.
Keep NGINX Current
One of the most important hardening recommendations is to keep your software up-to-date. Use your favorite package manager (apt-get, yum, etc) to update your NGINX install. These updates will often address security vulnerabilities that have been discovered or published. Depending on your Linux knowledge, you can also compile your install from source, which will let you install other modules like mod_security. Compiling from source will usually give you a later build than the package repositories, but it requires a little extra work.
Remove Unnecessary Modules From NGINX
To explicitly remove modules from NGINX while installing from source, do:
# ./configure --without-module1 --without-module2 --without-module3
For example:
# ./configure --without-http_dav_module --withouthttp_spdy_module
Note: Configuration directives are provided by modules. Make sure you don’t disable a module that contains a directive you will need down the road! You should check the NGINX docs for the list of directives available in each module before taking a decision on disabling modules.
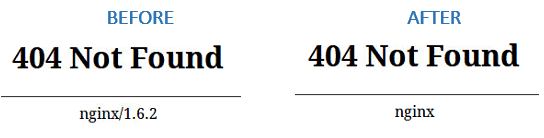
Disable server_tokens Directive in NGINX
The server_tokens directive tells NGINX to display its current version on error pages. This is not desirable since you do not want to share that information with the world in order to prevent attacks at your web server caused by known vulnerabilities in that specific version.
To disable the server_tokens directive, set it to off inside a server block:
server {

listen       127.0.0.1:80;

Server_tokens        off;

server_name  website.com www.website.com;

...

}
Restart nginx and verify the changes:
Deny HTTP User Agents in NGINX
A HTTP user agent is a software that is used for content negotiation against a web server. This also includes malware bots and crawlers that may end up impacting your web server’s performance by wasting system resources. In order to more easily maintain the list of undesired user agents, create a file (/etc/nginx/blockuseragents.rules for example) with the following contents:
map $http_user_agent $blockedagent {

default         0;

~*malicious     1;

~*bot           1;

~*backdoor      1;

~*crawler       1;

}
Next, place the following line before the server block definition:
include /etc/nginx/blockuseragents.rules;
And add an if statement to return a 403 response if the user agent string is in the black list defined above:
include /etc/nginx/blockuseragents.rules;

server {

if ($blockedagent) {

return 403;

}

listen       127.0.0.1:80;

Server_tokens        off;

server_name  website.com www.website.com;

...

}
Restart NGINX, and all user agents whose string matches the above will be blocked from accessing your web server.
Disable Unwanted HTTP Methods in NGINX
HTTP methods indicate the desired action to be taken on a resource served by NGINX. For common web sites and applications, you should only allow GET, POST, and HEAD and disable all others. To do so, place the following lines inside a server block. A 444 HTTP response means an empty response and is often used in NGINX to fool malware attacks:
server {

if ($request_method !~ ^(GET|HEAD|POST)$) {

return 444;

}

...

}
Set Buffer Size Limitations in NGINX
To prevent buffer overflow attacks against your NGINX web server, set the following directives in a separate file (create a new file named /etc/nginx/conf.d/buffer.conf and include:
client_body_buffer_size  1k;

client_header_buffer_size 1k;

client_max_body_size 1k;

large_client_header_buffers 2 1k;
The directives above will ensure that requests made to your web server will not cause a buffer overflow in your system. Once again, refer to the docs for further details on what each of them does. You may need to tweak these values depending on the web application you’re using.
Then add an include directive in the configuration file:
include /etc/nginx/conf.d/*.conf;
Note: You can also add the above directives directly inside the nginx.conf file within the http{} section.
Limit the Number of Connections by IP in NGINX
In order to limit the connections by IP, use the limit_conn_zone (in a http context or at least outside the server block) and limit_conn (in a http, server block, or location context) directives. However, keep in mind that not all connections are counted – but only those that have a request processed by the server and its whole request header has been read.
Within your nginx.conf http{} section, add this code:
limit_conn_zone $binary_remote_addr zone=addr:5m;

limit_conn addr 10;
In the above example, this will block an IP if it makes more than 10 connections. You can also add the limit_conn within your server block.