If you’re a blogger or a web developer, there will hopefully come a time when you out-grow a shared host and need either a VPS or a dedicated server to run your website. In this article, I’ll walk you through the steps to do a LEMP install on a Red Hat based Linux Distribution like RHEL, CentOS 7, or Fedora. A LEMP install will get you setup with NGINX as the web server running with PHP7 and MySQL for the database server. PHP7 should be remarkably faster than PHP5 was, and it’ll have the OPcache module installed and turned on by default, which will speed things up even more.
ALSO READ: TECKLYFE – LEMP Install NGINX PHP7 MySQL on Ubuntu 16.04 Server
Getting Started
The first step you’ll need to do is get a server setup somewhere with CentOS 7, RHEL, or Fedora. You could go the cloud route with Azure or Amazon AWS, or find another hosting company that will setup the server for you. This article will assume you know some Red Hat Linux basics like using SSH and Yum.
Note about SELinux: If you run into issues with Nginx not running, make sure the SELinux context of your Nginx configuration files is correct or change the SELinux mode to permissive or disabled.
When you install your server, you’ll want to check for updates which will get your server patched. For this, you’ll want to run the following command:
sudo yum update
LEMP Install Components
Install NGINX
First you need to install the CentOS 7 EPEL repo. To add the CentOS 7 EPEL repository, open terminal and use the following command:
sudo yum install epel-release
Now that the Nginx repository is installed on your server, install Nginx using the following yum command:
sudo yum install nginx
Afterwards, your web server is installed. Once it is installed, you can start Nginx:
sudo systemctl start nginx
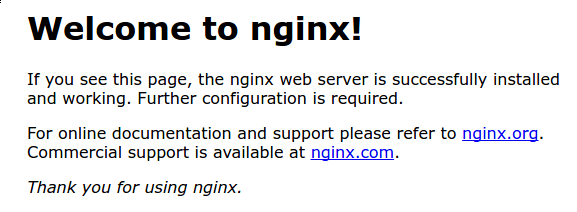
If you browse to your public IP address from a browser, you should see a page similar to this:
Next you’ll enable Nginx to start on boot. Use the following command to do so:
sudo systemctl enable nginx
Install MySQL (MariaDB)
Next we’ll install MariaDB which is a MySQL drop-in replacement. MariaDB is a community-developed fork of the MySQL relational database management system.
sudo yum install mariadb-server mariadb
When the installation is complete, we need to start MariaDB with the following command:
sudo systemctl start mariadb
Now that our MySQL database is running, we want to run a simple security script that will remove some dangerous defaults and lock down access to our database system. Start the interactive script by running:
sudo mysql_secure_installation
The last thing you will want to do is enable MariaDB to start on boot. Use the following command to do so:
sudo systemctl enable mariadb
Install PHP 7
First you’ll want to add the Webtatic repo:
sudo rpm -Uvh https://mirror.webtatic.com/yum/el7/webtatic-release.rpm
Use the following command to install PHP 7 on your system.
sudo yum install php70w php70w-fpm
You can run php -v to verify that PHP 7 is installed.
Next you’ll want to install some PHP modules based on your needs, we’ll start with these:
sudo yum install php70w-xml php70w-soap php70w-xmlrpc

sudo yum install php70w-mbstring php70w-json php70w-gd php70w-mcrypt php70w-mysql
You can run this command to see other PHP modules that are available:
sudo yum search php70
Now we need to secure PHP7 since it has a small loop for hackers by default and we need to edit the PHP.ini file. We can use any of text editor like nano or vim.
sudo nano /etc/php.ini
Now find cgi.fix_pathinfo. Use Ctrl+W to activate search function in nano editor. Now you will see that its value is set to 1 by default like this cgi.fix_pathinfo=1, so change its value to 0 like this: cgi.fix_pathinfo=0 and save it via Ctrl+O.
Next, open the php-fpm configuration file www.conf:
sudo nano /etc/php-fpm.d/www.conf
Find the line that specifies the listen parameter, and change it so it looks like the following:
/etc/php-php.d/www.conf — 1 of 3
listen = /var/run/php-fpm/php-fpm.sock
Next, find the lines that set the listen.owner and listen.group and uncomment them. They should look like this:
/etc/php-php.d/www.conf — 2 of 3
listen.owner = nobody

listen.group = nobody
Lastly, find the lines that set the user and group and change their values from “apache” to “nginx”:
/etc/php-php.d/www.conf — 3 of 3
user = nginx

group = nginx
Then save and quit.
Now, we just need to start our PHP processor by typing:
sudo systemctl start php-fpm
Next, enable php-fpm to start on boot:
sudo systemctl enable php-fpm
ALSO READ: TECKLYFE – HTTP/2, HTTPS, Let’s Encrypt, NGINX and WordPress Hardening
Configuration
Configure NGINX to Use the PHP Processor
Now we need to configure NGINX to use PHP7 to serve our dynamic content.
sudo nano /etc/nginx/sites-available/default
You’ll want to look for this line and add index.php like I did in bold.
# Add index.php to the list if you are using PHP

index index.php index.html index.htm index.nginx-debian.html;
Next, you’ll want to uncomment (remove the #’s) in front of the php7.0-fpm.sock section, like this:
 # pass the PHP scripts to FastCGI server listening on 127.0.0.1:9000

        #

        location ~ .php$ {

                include snippets/fastcgi-php.conf;
# # With php7.0-cgi alone:
# fastcgi_pass 127.0.0.1:9000;
# With php7.0-fpm:
fastcgi_pass unix:/run/php/php7.0-fpm.sock;
}
You’ll also want to deny access to .htaccess file since NGINX doesn’t use them:
        # deny access to .htaccess files, if Apache's document root

        # concurs with nginx's one

        #

        location ~ /.ht {

                deny all;
Exit and save your configuration.
Now you can test it with this command:
sudo nginx -t
If you didn’t get any errors, then go ahead and restart the NGINX, PHP, and MySQL services:
sudo systemctl restart nginx

sudo systemctl restart php-fpm

sudo systemctl restart mariadb