As a part of a Microsoft Azure account, you can create a storage account and an Azure File Share that you can map to a drive in Windows 10 using the industry-standard SMB protocol. If you have an operating system newer than Windows 8.1 and Windows Server 2012, it will use SMB 3.0. This includes Windows 10, Windows Server 2016, and Windows Server 2019. You can also map the file share using macOS and Linux. You can manage the the Azure File Share using the Azure CLI, PowerShell, APIs, Azure Storage Client Libraries, Azure Storage REST API, or by mapping it to a Windows 10 drive.
Create an Azure Storage Account
The first step is to create an Azure Storage Account. In Azure, go to the Storage Accounts blade and select the account you want to use, or create a new one.
If you’re creating a new one, select the appropriate Subscription and Resource Group you want to use. Give the Storage Account a name and location close to your on-prem location. For pricing purposes, you can select Standard Performance and Locally-Redundant Storage (LRS) for replication.
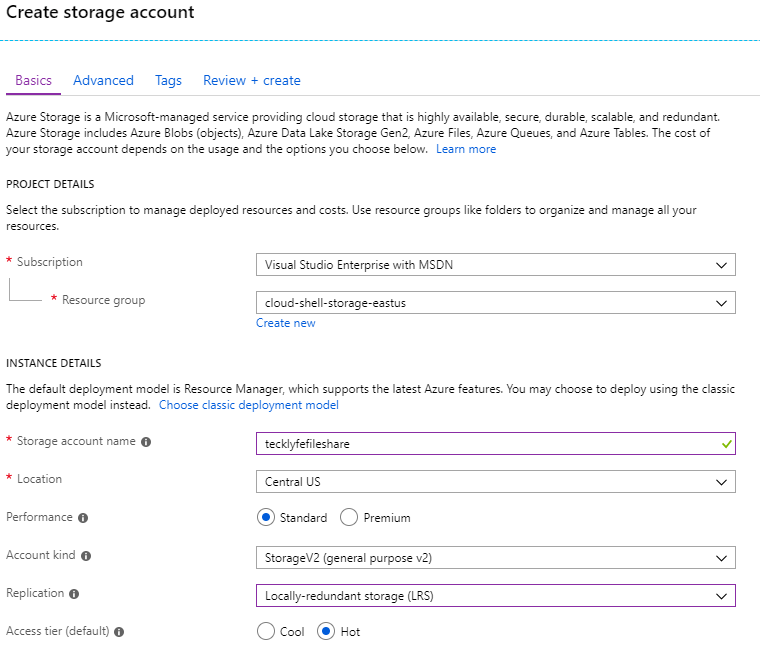
Click on Review+Create to create the Storage Account. You can also go to the Advanced tab if you want to change some more settings, but the defaults should be good.
Once the Storage Account passes validation, click on the Create button. The deployment could take a few minutes to complete. Once the deployment is complete, click the Go To Resource button.
Create an Azure File Share
Once you’re in your Storage Account resource, in the left menu there’s a section called File Service. Click on the Files option under File Service. Then click on the +File Share button at the top to create a new File Share. Specify a Name and a Quota in GiB, then click Create.
Map the Azure File Share in Windows
Once the Azure File Share is created, click on it to go into the File Share blade. In the top menu, click on the Connect button. In the Action Pane, you’ll have options for Windows, Linux, and MacOS.
For Windows, select the Drive Letter you want to use, then run either the PowerShell command or Net Use command provided. Open the regular PowerShell or Command Prompt to run these commands. If you run them as administrator, the drive won’t appear in File Explorer.
If you have any errors while trying to map the Azure File Share in Windows, you can refer to the Troubleshoot Azure Files problems in Windows article from Microsoft. Some common errors are:
- System error 5 has occurred. Access is denied.
- System error 53 has occurred. The network path was not found.
- System error 67 has occurred. The network name cannot be found.
- System error 87 has occurred. The parameter is incorrect.
- Error 1816 “Not enough quota is available to process this command”